ART LESSON PLAN
Title: Quilt Block Unit: Westward Expansion
Grade Level: 4-5 Medium: Cut paper
Suggested Time: 50 min class period
Instructional Objectives:
Students know and compare the characteristics of artworks in various eras and cultures.
Identify works of art from U.S. Westward Expansion. (GLE)
Elements of Art - Line, space, shape
Principles of Design - Pattern, balance, unity
Vocabulary
Diagonal, geometric, positive space, negative space, proportion, symbol
Materials & Equipment
1 - 6" x 6" square, solid color cardstock
2 - 2" x 2" squares of solid color cardstock (different than the big square)
2 - 2" x 2" squares of printed paper (2 ea, different patterns)
1- 7" x 7" square, solid color cardstock (different color than 6" x 6") (Pictured in last frame)
Ruler
Scissors
Pencil
Glue
Art Production
Look at different types of quilt patterns
Show a power point presentation on the history of quilts and specific patterns used in the Underground Railroad and what each represents.
Students will use solid and printed paper to create your own quilt block.
First, make sure students have gathered all materials needed for project.
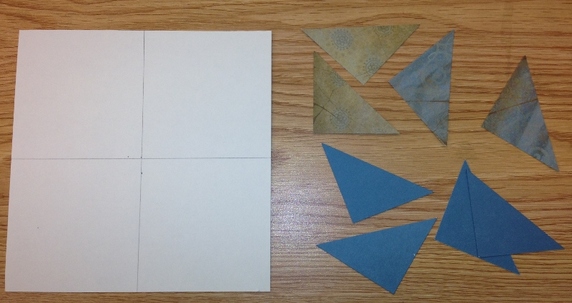
Begin with 6" x 6" solid paper and the four 2" x 2" squares.
Title: Quilt Block Unit: Westward Expansion
Grade Level: 4-5 Medium: Cut paper
Suggested Time: 50 min class period
Instructional Objectives:
Students know and compare the characteristics of artworks in various eras and cultures.
Identify works of art from U.S. Westward Expansion. (GLE)
Elements of Art - Line, space, shape
Principles of Design - Pattern, balance, unity
Vocabulary
Diagonal, geometric, positive space, negative space, proportion, symbol
Materials & Equipment
1 - 6" x 6" square, solid color cardstock
2 - 2" x 2" squares of solid color cardstock (different than the big square)
2 - 2" x 2" squares of printed paper (2 ea, different patterns)
1- 7" x 7" square, solid color cardstock (different color than 6" x 6") (Pictured in last frame)
Ruler
Scissors
Pencil
Glue
Art Production
Look at different types of quilt patterns
Show a power point presentation on the history of quilts and specific patterns used in the Underground Railroad and what each represents.
Students will use solid and printed paper to create your own quilt block.
First, make sure students have gathered all materials needed for project.
Begin with 6" x 6" solid paper and the four 2" x 2" squares.

Model and demonstrate next steps with 1 of the 2" x 2" squares and how to divide square...
Divide and cut the 2" x 2" squares into even triangular pieces by using a diagonal line.
Divide the 6" x 6" square into 4 equal parts. Each square should be 3" x 3".
Ask for thumbs up/down to check for understanding. Allow students to continue with other blocks.
Divide and cut the 2" x 2" squares into even triangular pieces by using a diagonal line.
Divide the 6" x 6" square into 4 equal parts. Each square should be 3" x 3".
Ask for thumbs up/down to check for understanding. Allow students to continue with other blocks.

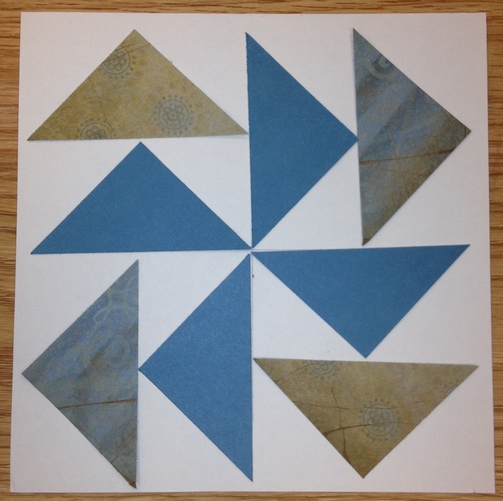
Once students have their large square divided and triangles cut, continue demonstration of the following steps, then allow students to proceed with all steps.
1. Lay the cut pieces out on the cardstock first before gluing down to make sure the pattern matches the example, and that all pieces fit.
2. Begin by placing solid color triangles with the longest side on the lines.
3. Next, place patterned paper triangles above solid paper triangles facing the same way.
4. When satisfied with the placement, begin gluing the pieces into place.
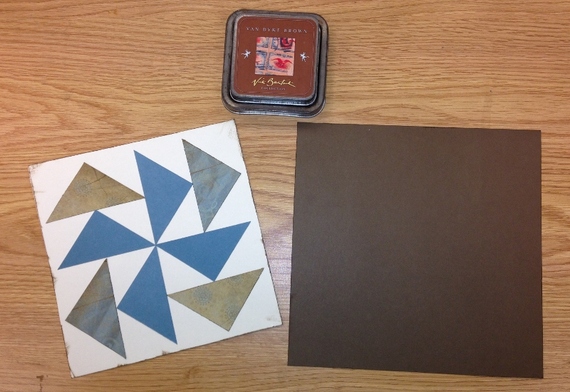
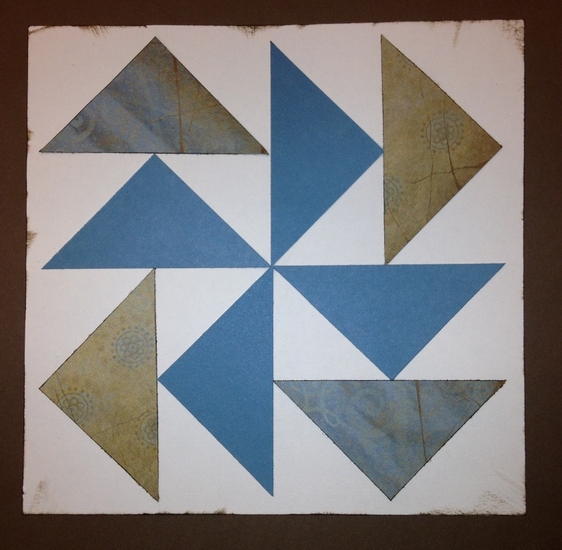
Once all the pieces are glued down, you may choose to ink the edges for a distressed look, this step can be skipped.
Mount quilt piece onto a 7" x 7" piece of solid colored paper.
Mount quilt piece onto a 7" x 7" piece of solid colored paper.
You have created a Flying Geese quilt block!
(Other patterns and directions will be added at a later time)
(Other patterns and directions will be added at a later time)
Art History
For this project, we will learn about the history of quilts: general history of quilts,
uses for quilts, the history of quilt patterns used as part of the Underground Railroad system.
Aesthetic Questions
Why would quilts be considered art?
What would be a significance for preserving and displaying a quilt? Can they be seen in a museum? Why?
Art Criticism
When completed, finished pieces could be matted and framed, or displayed together to form a
class quilt.
Discuss the pattern and what it would mean to the men, women, and children as they moved North and saw the different patterns.
Evaluation Criteria:
RUBRIC
Content:
The quilt block represents a flying geese pattern.
1 2 3 4 5
Craftsmanship:
The quilt block is done neatly. No pencil marks or extra glue showing. Triangles are placed in a straight pattern, not crooked.
2 4 6 8 10
Completion:
Project was completed by assigned due date and turned in on time.
1 2 3 4 5
Comments:
/20
QUIZ
Match pattern to meaning:
1._____Bear Claw a. Pack all necessary supplies
2._____Monkey Wrench b. Look for a safe house with the same symbol
3._____Flying Geese c. Fly north in the spring, so slaves should go north
4._____Wagon Wheel d. Follow the north star.
5._____Cross Roads e. Leads to water
6._____Log Cabin f. Dress up, new clothes to pass for free blacks in the North.
7._____Shoo Fly g. Gather tools for the journey.
8._____Bow Tie h. Five different freedom trails led from Cleveland, OH
9._____Star i. Believed to represent a free black to help slaves escape to freedom.
Answers: e, g, c, a, h, b, i, f, d
Modifications/Special Notes/Drawing
Younger children could use a larger base and shapes could be cut ahead of time.
Additional patterns from the power point presentation can be made . These could be displayed during February, Black History Month, to tell about the Underground Railroad.
